Configuring Native Integration B/W Outgrow & Braze
Braze is a comprehensive customer engagement platform that empowers businesses to create personalized and meaningful interactions with their audience across multiple channels. It provides tools for messaging, marketing automation, data analytics, and more.
Advantages of Using Braze with Outgrow
Enhanced Lead Nurturing: Capture leads generated through Outgrow interactive content (quizzes, calculators, etc.) and seamlessly pass them to Braze for targeted follow-up campaigns, personalized messaging, and nurturing workflows.
Improved Segmentation & Targeting: Leverage Outgrow data captured within Braze to segment your audience based on their interactions with your content, enabling you to deliver highly relevant and targeted messages.
Data Enrichment: Enrich your Braze user profiles with valuable data collected through Outgrow, such as lead scores, preferences, and interests, leading to a deeper understanding of your customers.
Streamlined Workflows: Automate the transfer of lead data from Outgrow to Braze, eliminating manual processes and saving time.
Prerequisites for configuring the Integration
A. An active Outgrow account
B. An active Braze account
C. The REST API Key from Braze
D. A live Outgrow content piece.
How to configure the integration
To configure the integration between Outgrow and Braze, here are the steps that you need to follow:
1. Log in to your Outgrow account and select the appropriate content piece.

2. Open the respective content in Build mode.

3. Click on the Configure tab and then navigate to the Integrations sub-tab. Under Integration, go to Native Integrations and scroll down to Braze integration.

4. Click the configure icon for native integration for Braze.
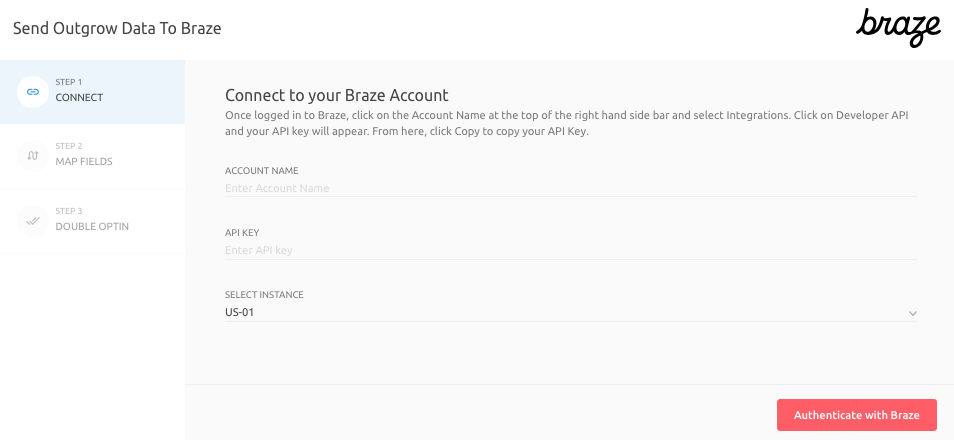
5. An integration configuration window will open after clicking the Configure Integration icon. To authenticate the integration, you need to use the following credentials:
A. Account Name: This is for internal purposes only and could be anything.
B. Rest API Key from Braze: To obtain the API key, navigate to the Settings and then to the API Keys section in Braze. Click on "Create New API Key" and fill in the necessary details. Once the key is generated, securely copy the provided key.
C. Braze Instance: Specify the Braze instance that is used for your Braze account. The instance number can be found in the Unique URL of your Braze account.

6. Once the details are added, click on Authenticate With Braze.
Steps to Generate REST API Key
A. Log in to your Braze account. Access your Braze dashboard using your credentials.
B. Navigate to "Settings." In the top right corner of the dashboard, click on the gear icon to access the "Settings" menu.
C. Select "API Keys." From the Settings menu, choose the "API Keys" option. This will take you to the API Keys page.
D. Click "Create New API Key." On the API Keys page, click the "Create New API Key" button. This will open a modal window.
E. Provide Key Details:
- Key Name: Enter a descriptive name for your API key (e.g., "Outgrow Integration").
- Permissions: Select the specific permissions you want to grant this API key. For the Outgrow integration, you'll likely need permissions related to creating or updating user profiles and potentially sending messages or triggering campaigns.
F.Click the "Create" button to generate the API key. Make sure to copy the API key immediately, as it will only be displayed once. Store it securely in a password manager or other safe location.
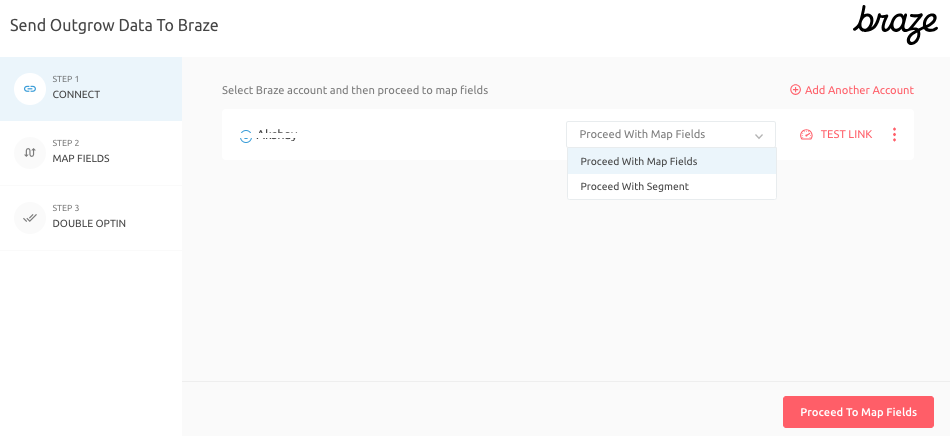
7. Once your account is connected, choose whether to Proceed With Map Fields or Segments.
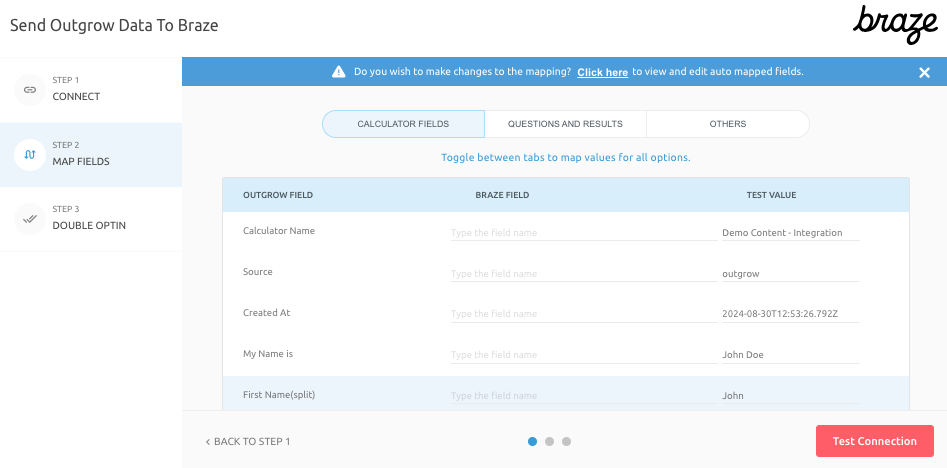
8. Once you have selected the appropriate list or segment, you can map the respective Outgrow fields with the respective fields in Braze. Click on Test Connection to authenticate the field mappings.
9. You can configure Double Opt-In functionality if required; otherwise, click Finish to save the configuration and set the integration to active.
Additional integrations related actions
After configuring and activating the integration, you can access the Braze block to view additional actions that can be performed on the Braze integration. There are four options available:
A. Re-configure: If your Braze credentials have changed or you want to connect Outgrow with a different account, reconfigure your Braze integration to continue receiving Outgrow leads in your Braze account.
B. View Mapping: If you need to review the fields you have mapped to configure your Outgrow and Braze integration, click View Mapping.
C. Task History: This section lists all the leads sent to Braze. If leads fail to sync, they will be shown as "Failed." If this happens, you can sync the leads to your Braze account after reconfiguring. If the leads are waiting to be synced, they will have the status "Waiting."
D. Filter: This feature allows you to set up a quick filter using First Name, Last Name, and Email Address to see if the lead was sent on Braze.
Important Note
For every Outgrow content piece you create, you will have to activate or deactivate the integration from the Configuration section in the builder, in order to start or stop sending leads collected in Outgrow to Braze.
If you have any questions or concerns, please feel free to contact us at [email protected], and we will be happy to assist you further.
Updated over 1 year ago