Integrate Klaviyo & Outgrow With Oauth Authentication Native Integration
Klaviyo is an eCommerce marketing automation platform focused on email marketing and SMS. It syncs with your website store to help grow your business. You can now utilize Outgrow interactive experiences designed to boost conversion and engagement. You can also push the leads you've gathered to Klaviyo using our native integration with Klaviyo. To set up the integration, you will need access to:
A. An active Outgrow account.
B. An active Klaviyo account.
C. A live Outgrow content piece.
This guide will walk you through how to configure the integration in Outgrow.
Configuring integration between Outgrow and Klaviyo
To configure the integration between Outgrow & Klaviyo, you can follow the below-mentioned steps:
1. Log in to your Outgrow account and open the respective content in Build mode.
2. Once you're in the builder, go to the Integrations section in the Configure tab. Look for Klaviyo integration under Native Integrations and click the Configure icon (Gear Icon) to set it up.

3. In the integration configuration window click on Authenticate With Klaviyo.
.png")
4.To connect your Outgrow & Klaviyo account, enter your Klaviyo Email and Password and click on Log In.

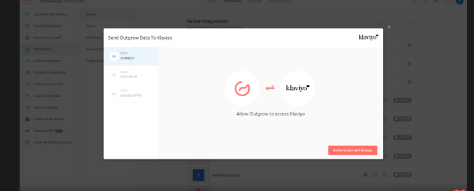
5. In order for the data to be sent from Outgrow to your Klaviyo account, click Allow to grant Outgrow access permission to your Klaviyo account.

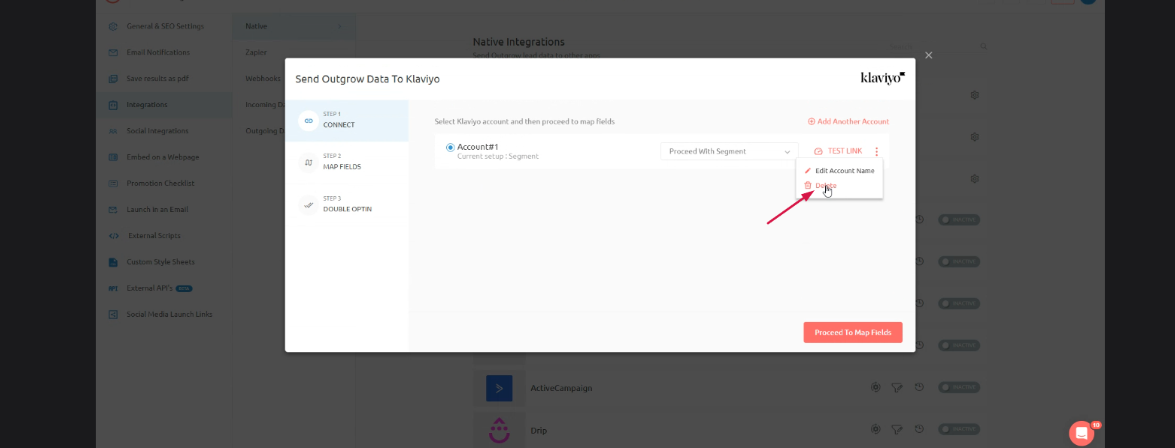
6. Once the authentication is complete, you can proceed with the list or the segment.

7. After choosing to proceed with the list, you can select the list in Klaviyo to which the leads will be added. You can also choose the method by which you want the leads to be added.

IMPORTANT NOTE
Members & Subscribe are 2 API POST methods. You can use the Members method, to add the leads immediately to the list using integration. If you would like to subscribe leads to the list and use the double opt-in settings for the list, you can use Subscribe method.
8. Now, you can proceed to map the fields.

9. In case you have created a segment in Outgrow to group leads using criteria such as browser type, outcome received, etc., you can map the segment with a list in your Klaviyo account.
10. After clicking on Proceed with Segment, you can choose the Segment from Outgrow and the List in Klaviyo to which you want to send the leads.
11. Once you have finished, you can click on Map Fields.
12. After completing the setup, click on Test Connection. If you want to enable the Double Opt-in feature, you can choose to do so via Email or SMS in the final step. Once that's done, click on Finish to save the configuration and activate the integration.

IMPORTANT NOTE
1. You can set up multiple cases, i.e. you can select multiple segments and lists to pass on your leads to Klaviyo from more than one segment.
2. Under the If section, ie; Case 1, you will be specifying the segment in Outgrow that needs to be mapped, and under the Else section, ie; Case 2, you will specify the name of the list in which all the remaining leads will be added which do not meet the lead segregation criteria.
Important Information
This section outlines the expected user experience and system behavior when integrating Klaviyo with Outgrow, particularly concerning authentication, content access, and integration management. The following points detail various scenarios:
A. Scenario 1: When Klaviyo is Not Configured in Outgrow: If a user is redirected to Outgrow from the Klaviyo application and Klaviyo has not yet been configured within Outgrow, the user will be prompted to log in to their Outgrow account first. After successfully logging in, any attempt to access an Outgrow content piece will redirect them to the Klaviyo authentication page.
B. When Klaviyo is configured in Outgrow: Conversely, if Klaviyo is already configured in Outgrow, when a user clicks on Outgrow within the Klaviyo app and logs in to Outgrow, opening any content piece will directly redirect them to the Klaviyo configuration page within Outgrow.
C. Removing Klaviyo Integration: Removing the Klaviyo integration from your Outgrow account will also result in the deletion of the associated account from Klaviyo.
D. Improved Error Messaging:** A generic error message that previously appeared in certain scenarios has been updated to provide more specific and helpful information to users.
More Actions
After setting up the integration, you can explore more actions in the Klaviyo block:
A. Re-configure: If your Klaviyo credentials have changed or you want to connect Outgrow with a different Klaviyo account, you'll need to reconfigure your Klaviyo integration to continue getting Outgrow leads. If leads collected in Outgrow aren't showing in Klaviyo, try reconfiguring to fix it.

B. View Mapping: To review the mapped fields for your Outgrow-Klaviyo integration, simply click view mapping and toggle between tabs to see all fields.

C. Task History: The list contains all the leads sent to Klaviyo. Leads in the queue to be synced will have the status Waiting, and those that failed to sync will be shown as Failed. If leads from a content piece have not been sent due to a connection error, you can reconfigure and sync them to your Klaviyo account. All unsent leads will be sent when you sync. If you don't see your lead on your Klaviyo account after syncing, reconfigure once and then sync.

D. Deactivate: In case you do not wish to send leads from a content piece to Klaviyo, you can simply deactivate it.

IMPORTANT NOTE
1. For every Outgrow content piece you create, you will have to activate or deactivate the integration from the Configuration section in the builder, in order to start or stop sending leads collected in Outgrow to Klaviyo.
2. Email field is a required field and needs to be mapped in order for the integration to be configured.
If you have any questions or concerns, please feel free to reach out to us at [email protected], and we will be happy to assist you further.
Updated about 1 year ago