SSO - Using SAML Single Sign-On functionality in Outgrow
Security Assertion Markup Language (SAML) is an XML-based framework for enabling authentication through a third-party identity provider or in-house single sign-on application.
SAML comes in handy for organizations that use multiple applications or services and need a single source to manage member activity. Instead of creating multiple credentials for different applications, with SAML you can create one set of credentials per member and allow them to access multiple applications.
By option for SAML SSO organisations can:
A. Manage a password policy across multiple applications.
B. Access multiple applications securely.
C. Reduce the risk of lost or forgotten passwords.
Using this document, you will be able to learn how to configure SAML SSO and use Okta, OneLogin or Azure AD as one of the supported IdPs to log in to your Outgrow account.
IMPORTANT NOTE
A. SAML SSO is only available for accounts with an Enterprise plan or above.
B. Only Account Admins can enable Single Sign-On (SSO) in Outgrow.
Option 1: How to configure Okta as an IdP
You can add Outgrow app in Okta using the steps below:
A. Log in to your Okta account and search for Outgrow under Add applications.
B. Enter your Outgrow subdomain name in the Subdomain field and click Done.
C. Click View Setup Instructions under the Sign On tab to get access to:
C.1. Login URL
C.2. SAML Certificate
D. These are required and need to be pasted in your Outgrow User Interface while enabling SAML.
You can now navigate to the configure SAML in Outgrow section in the document to learn more about how to add these details in Outgrow to configure SAML.
Option 2: How to configure OneLogin as an IdP
You can add the Outgrow app in Onelogin using the steps below:
A. Log in to your OneLogin account and search for Outgrow under Add Apps. Click Save after selecting the Outgrow app.
B. Enter your Outgrow subdomain name in the Outgrow subdomain field under the Configuration tab and click on Save.
C. Go to the SSO tab and get the SAML 2.0 Endpoint (Login URL) and X.509 Certificate (SAML certificate). These are required and need to be added to your Outgrow account while enabling SAML.
You can now navigate to the configure SAML in Outgrow section in the document to learn more about how to add these details in Outgrow to configure SAML.
Option 3: How to configure Azure AD as an IdP
You can add Outgrow app in Microsoft's Azure Active Directory using the steps below:
A. Login to your Microsoft Azure Active Directory dashboard by clicking here. Click on Azure Active Directory option in the Azure dashboard.

B. Select Enterprise Applications in the Create area.

C. In the application's dashboard, click on Add New Application.

D. In the Application Gallery dashboard, click on Create your own application.

E. Name the application, for example, Outgrow SAML Test, and select Integrate any other application you don’t find in the gallery (Non-gallery). Then click on Create.

F. Now, go to the newly created Outgrow application and click on Set up single sign-on.

G. In the SSO configuration section, select SAML.

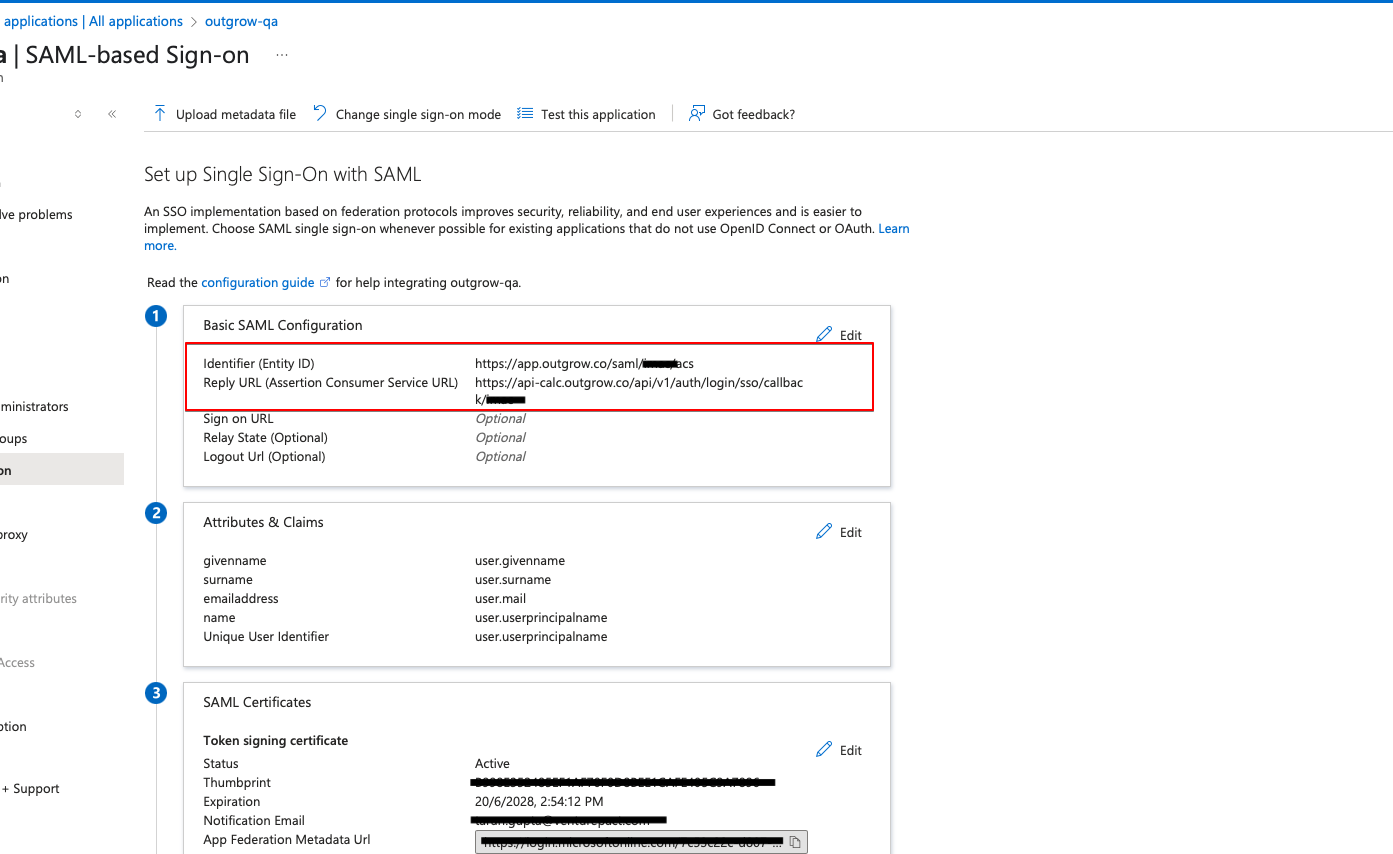
H. Now in the Basic SAML Configuration section, select Edit.

I. For Identifier (Entity ID) and for Reply URL (Assertion Consumer Service URL), you need to enter the following details, and then click on Save:
- In the Identifier (Entity ID) enter https://app.outgrow.co in the first field, and https://app.outgrow.co/saml/youroutgrowsubdomain/acs in the second field. Replace youroutgrowsubdomain with your actual Outgrow subdomain.
- For Reply URL (Assertion Consumer Service URL) enter https://api-calc.outgrow.co/api/v1/auth/login/sso/callback/youroutgrowsubdomain.
IMPORTANT
If your Outgrow subdomain is Demoaccount.Outgrow.Us, then the subdomain that you need to add in this step is DemoAccount.
J. Ensure that the user's email in Azure Active Directory matches the email used in Outgrow. This is essential for successful SSO authentication.
K. Now, scroll down to the Set Up SAML Test section (represented by Set up outgrow-qa section in the screenshot below). Copy the Login URL and paste it into the field provided in Outgrow's SAML Configuration page. Also, in the Signing Option present under SAML Signing Certificate, the configuration should be selected as Sign both the SAML Response and the Assertion.
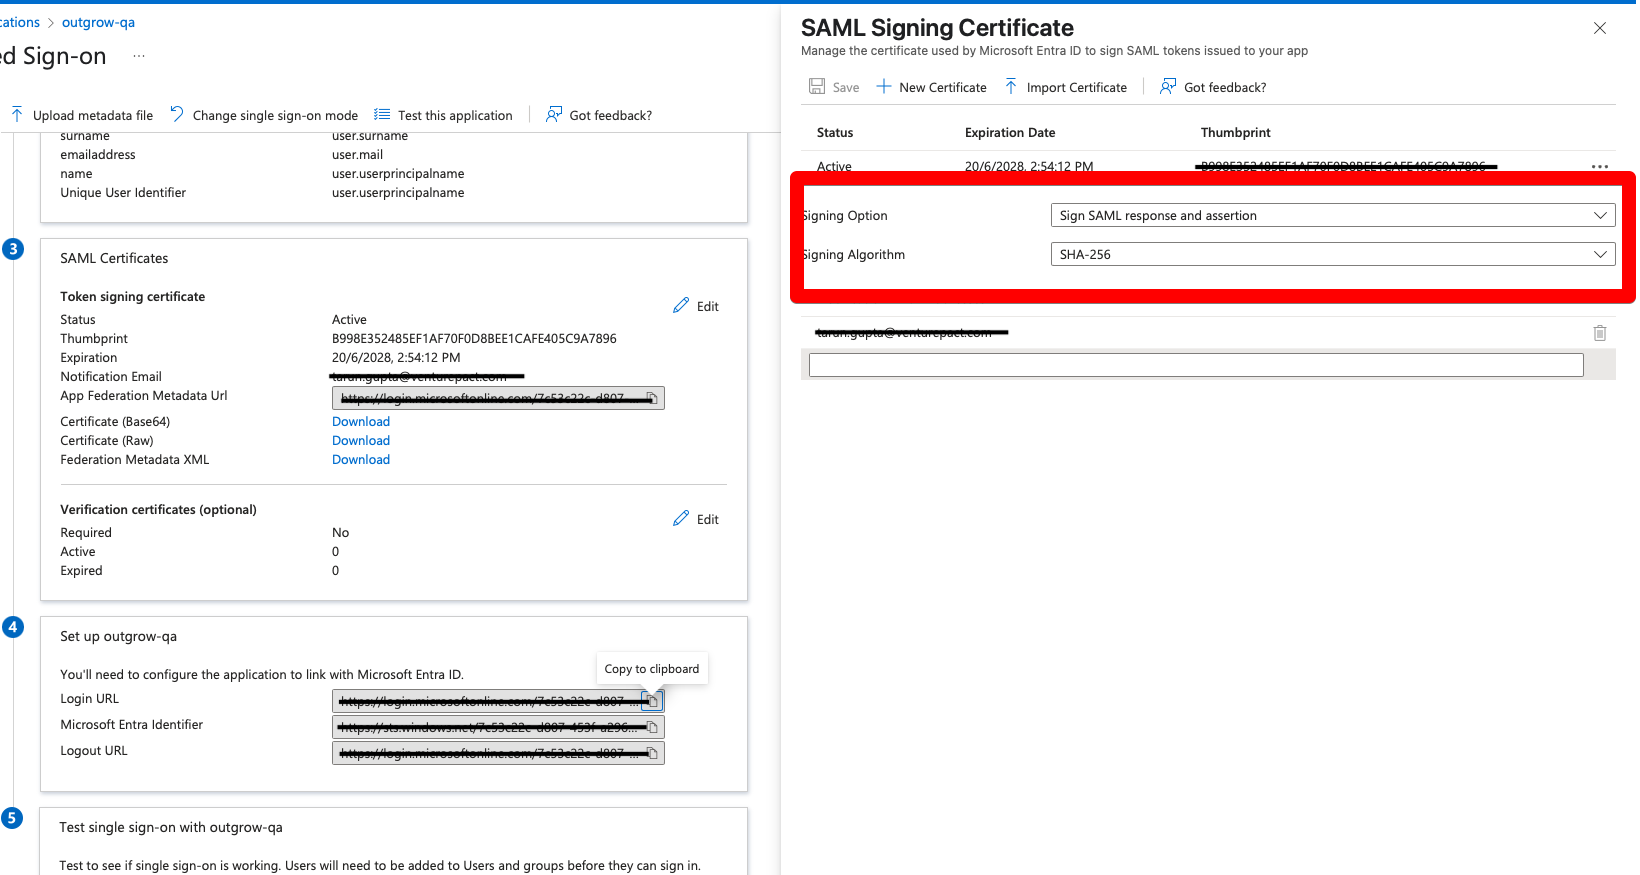
L. In the SAML Signing Certificate section, download the Base64 Certificate. Open the certificate in edit more, and copy the contents of the certificate between X509 Certificate tags ( & </X509 Certificate>)and paste it into the X.509 certificate for SAML authentication field on Outgrow’s SSO settings page.

M. Now, you need to make sure that the user's who will be accessing your Outgrow account using SSO, are also added as users in Azure. In Azure, return to the Enterprise Applications page.
N. Select the newly created application, and then select Assign users and groups.
O. Select + Add User, and then select Users. Search for the respective user and post selecting the respective users click on Select. To add the users click on Assign.
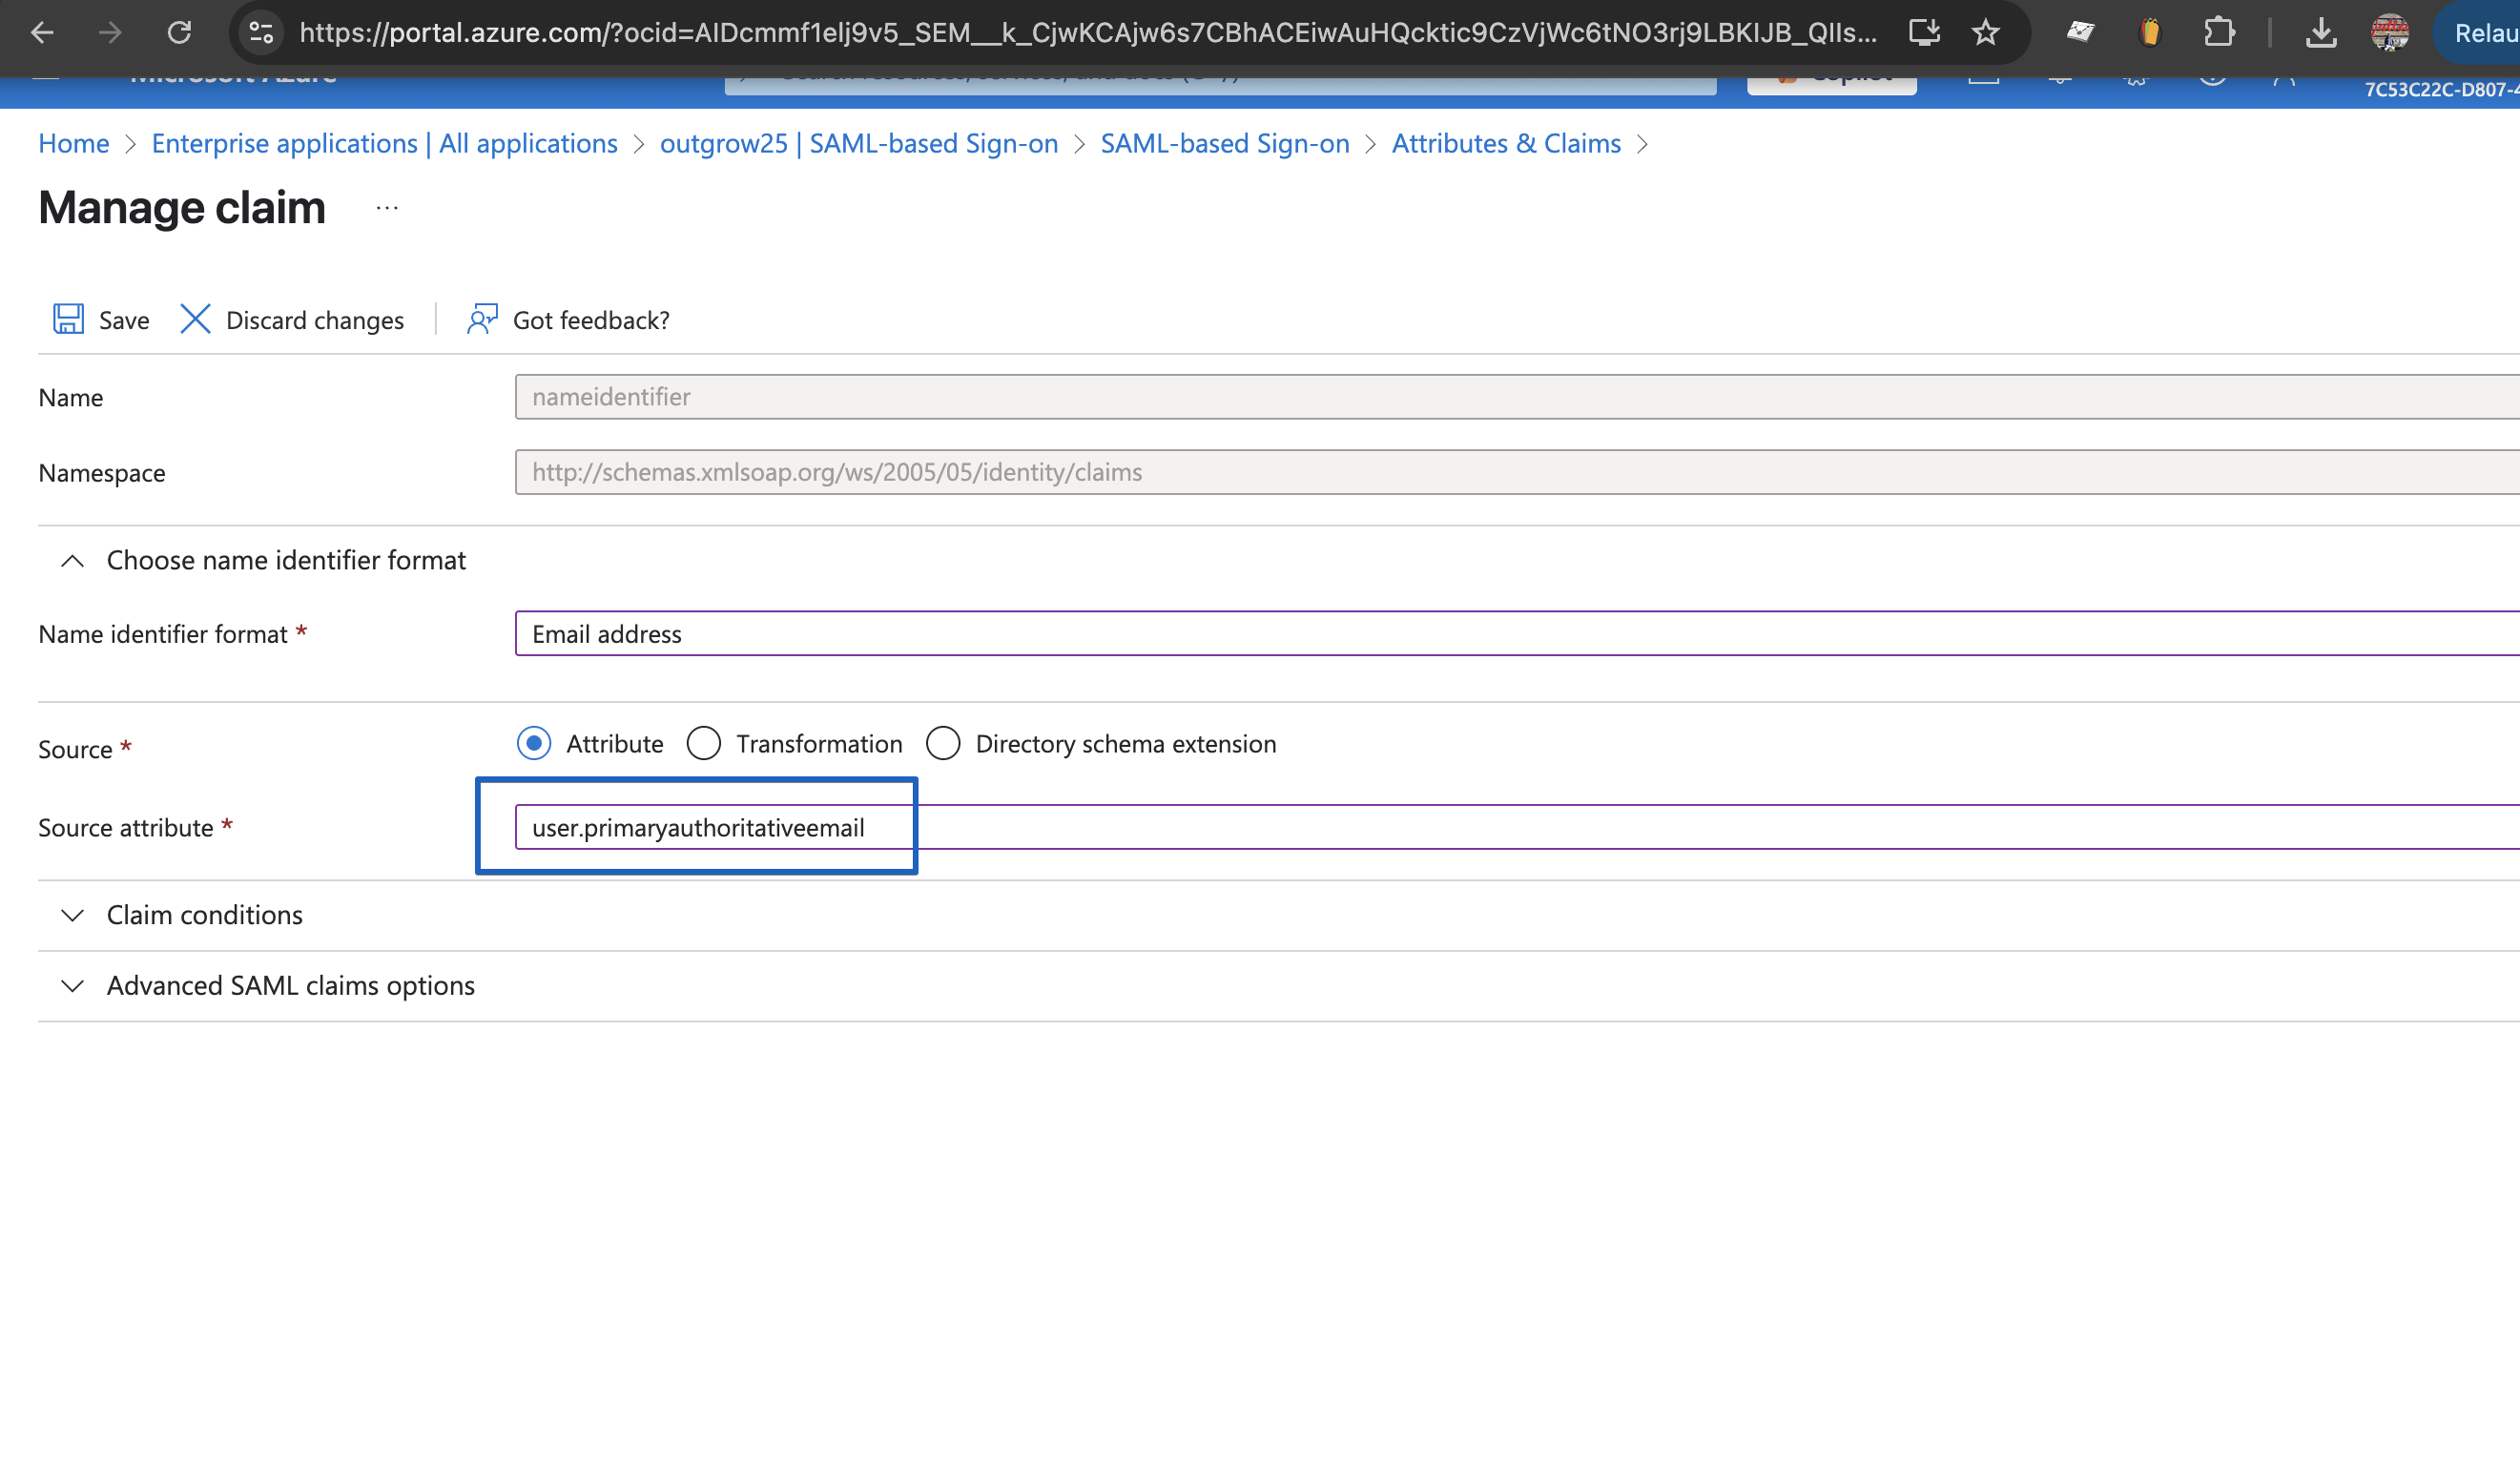
P. Also, for the User Attributes & Claims section, please make sure to update the Name Identifier’s source attribute to user.primaryauthoritativeemail. This ensures accurate identification of users during the SSO process.
How to configure SAML in Outgrow
A. Login to your Outgrow account by clicking here.
B. Once you have logged into your Outgrow account, click on the account name icon at the top and click on Billings & Settings.

C. Under Settings navigate to the My Account tab, and then navigate to the Security sub-tab.

D. Under the SSO section, toggle on the setting for SSO. Select SAML and then under Configure SAML section, add the Login URL and the SAML Certificate (X.509 Certificate retrieved from the IdP). Click on Confirm to save the setting.

NOTE: Login URL and SAML Certificate can be retrieved by following Step I and J in Option 2.
Once SAML SSO is configured for your Outgrow account, you will be able to login to your Outgrow dashboard using SSO.

Few important things to keep in mind
A. Okta, OneLogin and Azure AD are the supported IdPs in Outgrow. If you are using a different IdP, please raise a request with Outgrow Support.
B. Only one IdP can be configured per Outgrow account.
C. Outgrow supports SAML 2.0
D. Enabling SAML will disable 2 factor authentication (2FA) in Outgrow. This is to remove redundancy as the IdP will have the option to enable 2FA.
E. The team member's email address must be present in Outgrow and IdP.
F. The Login URL will take the user to the IdP's login page asking for login credentials. Login URL is provided by your IdP and must be added in Outgrow while integrating.
G. Outgrow accepts only X.509 Certificate to validate the authenticity of an IdP.
Feel free to use our chat tool on the bottom right or reach out to us at [email protected] in case you have any questions, and our team can help you with a quick solution.
Updated 10 months ago