Configuring Salesforce SSO Login for Outgrow Lead Forms
A Step-by-Step Guide
Outgrow's Salesforce Single Sign-On (SSO) integration allows users to seamlessly populate lead form fields using their Salesforce credentials, enhancing user experience and data accuracy. This guide provides detailed instructions on retrieving the necessary information from Salesforce and configuring the integration within Outgrow.
Configuring Lead Form In Outgrow
A. Login to your Outgrow dashboard and open the respective content in Build mode.
B. Once the content is open in Build mode, navigate to the Lead Generation Form settings.
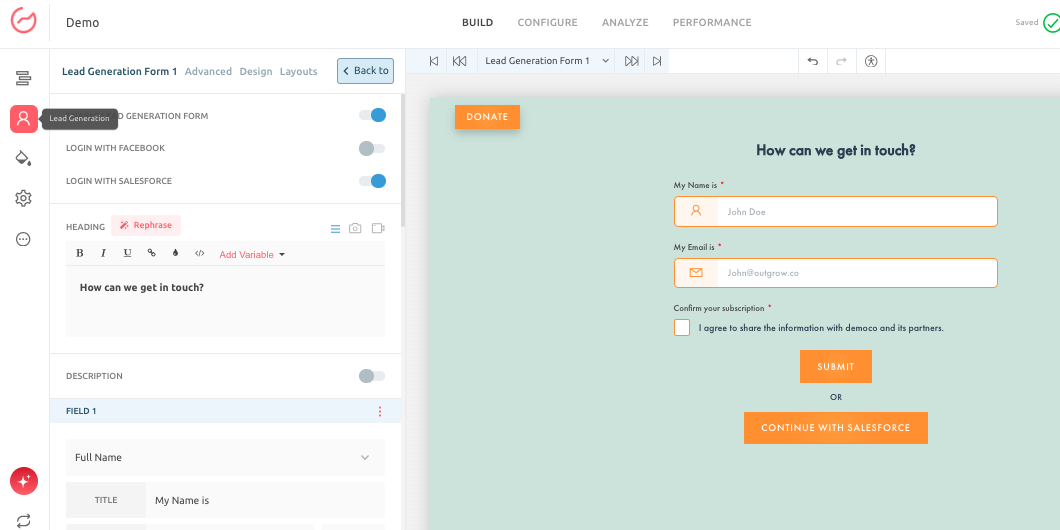
C. Enable the toggle for Login Via Salesforce.
D. Once the toggle is enabled, you need to enter the following Salesforce configuration details:
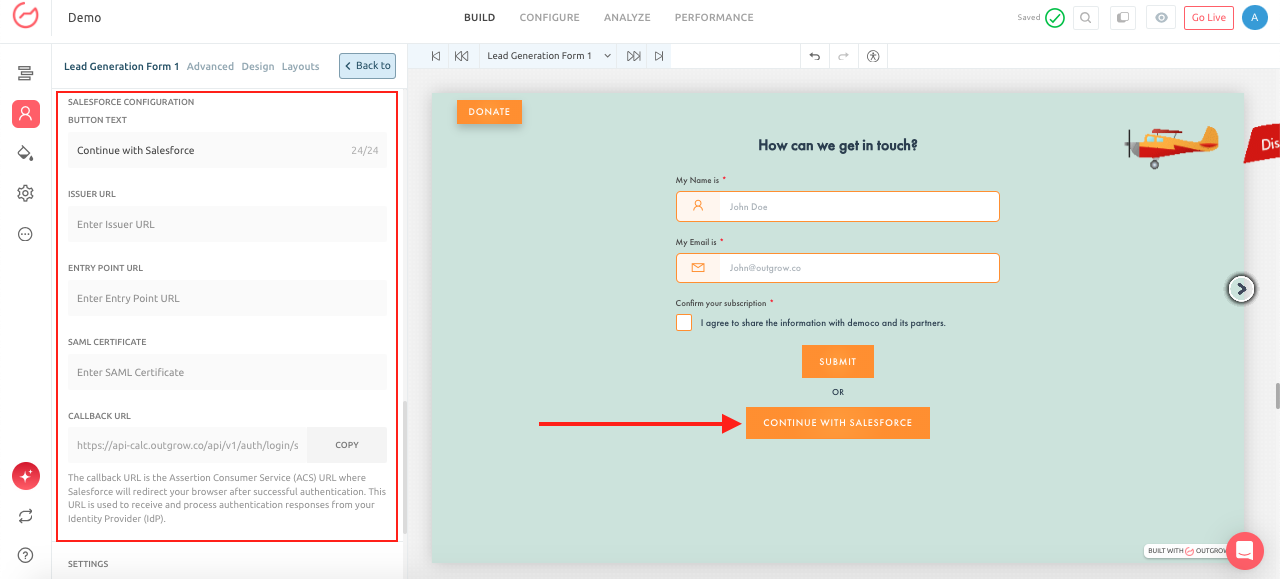
- Button Text: Customize the login button text (e.g., "Continue with Salesforce").
- Issuer URL: Paste the Issuer URL you copied from Salesforce.
- Entry Point URL: Paste the Entry Point URL you copied from Salesforce.
- SAML Certificate: Paste the SAML Certificate you copied from Salesforce.
- Callback URL: Outgrow will automatically generate a Callback URL. Copy this URL, and return to Salesforce SAML Configuration. In your Salesforce SAML configuration, locate the "Assertion Consumer Service (ACS) URL" field, and paste the Callback URL you copied from Outgrow into this field. Make sure you click on Save to save the changes in Salesforce.
E. Publish your Outgrow interactive content to save the configuration in Outgrow as well. Once the changes are published, in your Outgrow live content piece, users will be able to see a Login Via Salesforce button on the lead form that they can use to submit their lead details.
Retrieving Configuration Information From Salesforce
A. Access your Salesforce account with administrative privileges.
B. Click the gear icon in the top right corner and select "Setup." In the Quick Find box, type "Single Sign-On Settings" and select it.
C. Create or Edit a SAML Configuration: If you don't have an existing SAML configuration, click "New." If you have an existing configuration, select it and click "Edit."
D. Retrieve the Issuer URL: The Issuer URL is typically found in the "Basic Information" section of your SAML configuration. It may be labeled "Issuer" or "Entity ID." Copy this URL.
E. Retrieve the Entry Point URL: The Entry Point URL is the URL where Salesforce will send the SAML request. It may be labeled "Login URL" or "Identity Provider Login URL." Copy this URL.
F. Retrieve the SAML Certificate: The SAML Certificate is used to verify the authenticity of the SAML response from Salesforce. It may be labeled "Identity Provider Certificate." Copy the certificate. Be sure to copy the entire certificate, including the -----BEGIN CERTIFICATE----- and -----END CERTIFICATE----- lines.
Important Notes
- The Callback URL is generated by Outgrow and is essential for the integration.
- Ensure all information is entered accurately to avoid authentication errors.
- Test the SSO login thoroughly after configuration.
By following these steps, you can seamlessly integrate Salesforce SSO login with your Outgrow lead forms, providing a streamlined and efficient lead capture process. In case you still have any questions, feel free to reach out to us at [email protected], and I will be happy to assist you further.
Updated over 1 year ago