Webhooks - Using Webhooks to Transfer Data from Outgrow to Your CRM
Use Outgrow's Interactive Content designed for conversion and engagement and push the leads you have collected straight to a compatible web app or URL as soon as it is submitted using Webhooks.
What is a webhook?
It's helpful to understand that a webhook is a type of notification that is automatically triggered when a specific event occurs. In this case, the event is the submission of a new lead on Outgrow's calculator or quiz. When a new lead is submitted, a notification containing response data is sent to a designated Webhook URL that you set up in the configuration panel.
Outgrow's webhook notifications are sent via HTTP POST request, with the response data contained in JSON format in the request body.
Here's what you will need to get started
A. An Outgrow account (Freelancer and Essential plans do not include Webhook, Business and Enterprise plans include access to Webhooks through which users can send the lead data from Outgrow to any compatible URL)
B. An Endpoint (URL, where you want to send the data).
Note: If you need to generate a test URL you can do this using RequestBin or Mockbin.
What are the steps involved in configuring Webhooks
Follow two simple steps to start sending the leads you collect on Outgrow to an Endpoint using Webhooks
A. Configure your Webhook
B. Test connection
Configure
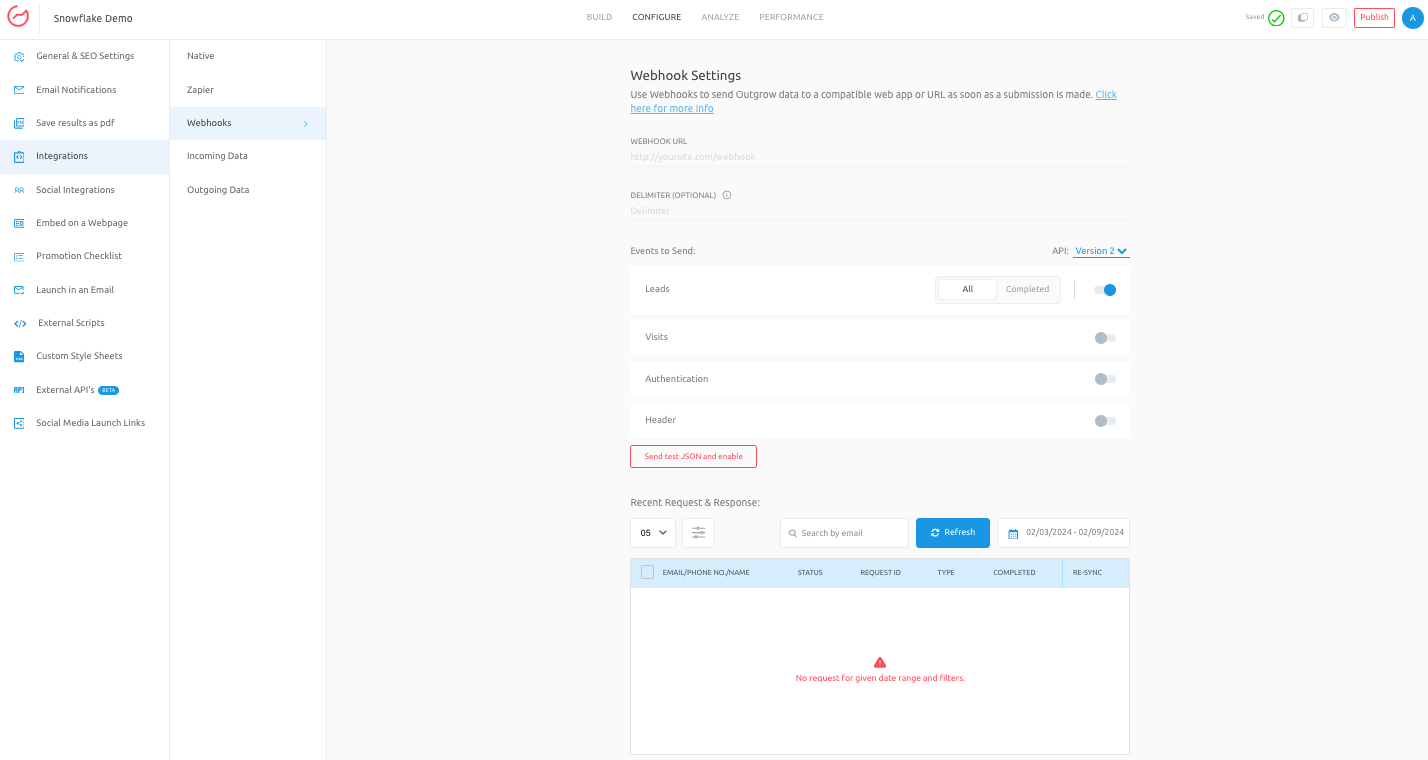
1. To access Webhooks, open the respective content in Build mode, and then under Configure, navigate to Webhooks under the Integrations sub-tab.

2. Enter the Webhook URL, which will be the endpoint to which we will make HTTP POST requests. In case you want to use a delimiter to separate values, you can do that using the Delimiter option.
3. Now, under Events To Send, you can configure the API version that you would like to use to transfer the data from Outgrow to your endpoint. You can also toggle on the setting for transferring Leads and Visits data as per your requirement.
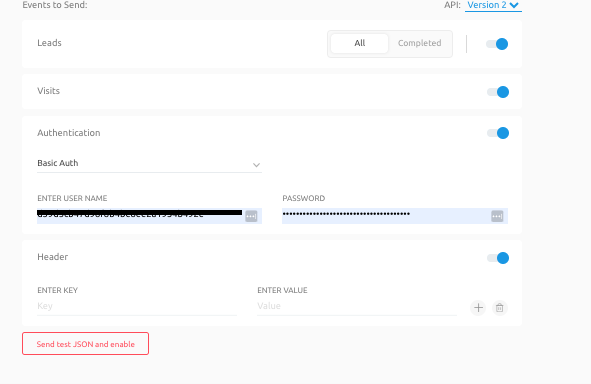
4. In case you want to authenticate the data request, you can enable the setting for Authentication, and choose the level of authentication that you would like to use. NOTE: Depending on whether you opt for Basic Authentication or you opt for OAuth 2.0 based authentication, you will be required to enter the authentication credentials.

5. Once you have configured the webhook settings, you can click on Send Test JSON and Enable Webhook.
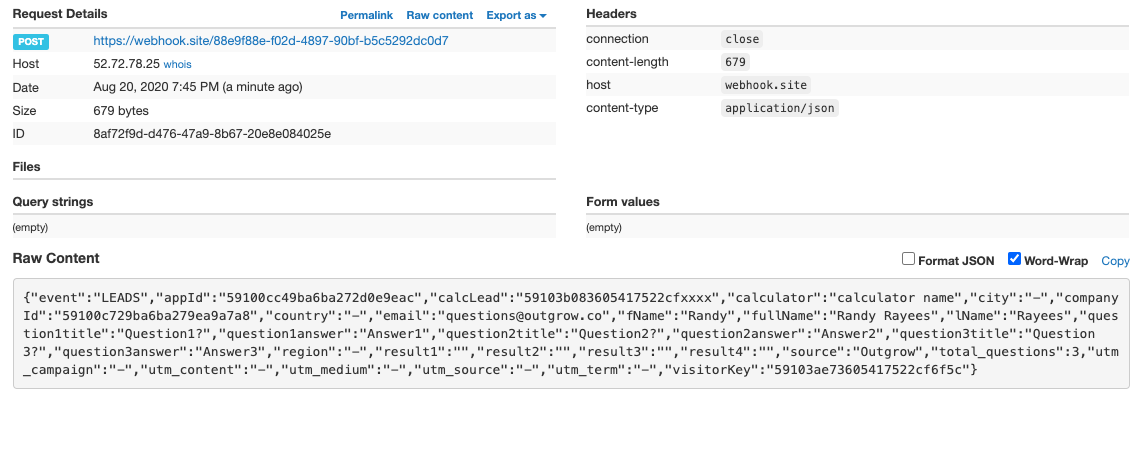
This is how successful payload delivery will look like at the specified endpoint in your CRM.

Once the Webhook is tested and saved, the leads from your Outgrow content will start flowing to the endpoint successfully.
Important Update while using Webhooks By Zapier
If you are using Webhooks by Zapier to transfer data collected using Outgrow and have chosen to duplicate quizzes in your account, then you can configure Webhooks in your Outgrow account as follows:
Scenario 1: If all quizzes have the same structure in terms of the number of questions, fields used in the lead form, etc., then you can use a single webhook. To do this, you can configure the Global Webhook in your Outgrow account under the Settings tab. You will need to set up the webhook connection every time you duplicate a quiz.
Scenario 2: If each quiz has a different structure, you will need a different webhook URL for each quiz. You can create a new zap for each quiz, which will generate a unique webhook URL for each duplicate quiz. You can navigate to the Integration section under the Configure tab for each Outgrow content and set up a separate webhook in this section. Here is a screenshot for your reference.
Note: When configuring the zap in Zapier, we recommend submitting a fresh test lead and fetching data for this lead.
FAQs:
Q1. What is a Webhook?
A: A Webhook can be used to receive data in real-time from Outgrow to your application's custom endpoint. You can receive data on Leads/Visits from Outgrow and use it as per your use-case.
Q2. What events are supported by Outgrow?
A: Outgrow supports two types of events:
-
Leads: When your lead generation form is filled, an event is triggered from Outgrow to your endpoint. The trigger also depends on the delay configured on the lead generation form if it is placed on the welcome screen.
-
Visits: In this case, an event of the visitor is triggered for each action. So you will receive the first event when someone lands on the calculator, and then every time a question is answered. The payload from Outgrow has a visitor ID that can be used to update the data for a single visitor.
Q3. What is the best way to test Webhook on Outgrow?
A: The best way to test Webhook is to go to this URL- https://webhook.site/ and copy the unique URL. Then, place the URL on Outgrow Webhook section and turn the leads or visits On/Off as per your use case. Try to add a lead to your live content piece, and you will receive the event data to the above site. You can analyze the data before handling it in your application.
Note: You should publish the changes before testing to ensure everything is configured correctly.
Q4. Can I pass data to the URL e.g. example.com/abc/email={email}?
A: No, Outgrow does not support interpolation to the Webhook endpoint. A POST request is sent to your endpoint, and the body contains all the data your content piece has generated.
Q5. What is the status code you send to my endpoint?
A: No status code is sent. However, a POST request is sent to your endpoint and seeks a status code return by your application. The 20X code is considered a success
Feel free to reach out to us in case you have any questions at [email protected], and we will be glad to assist you further.
Tip
For rapid testing and development purposes, you can use Pipedream to develop a workflow using the Outgrow webhook event provided above as a trigger. You can learn more about it here
Updated over 1 year ago