Embedding Widgets in Your Outgrow Content
Outgrow now lets you use multiple widgets in your Outgrow interactive content to offer additional real-time value to your users. You can embed any of the following widgets in your Outgrow content using a Custom HTML page:
A. Address Map Locator
B. Calendly
C. Chart
D. ChiliPiper
E. Country State & City List
F. Custom Html
G. Dynamic Dropdown
H. E-Signature
I. Outreach
J. Payment Widget
K. Pdf Embedder
L. Phone Number Verification
M. Products
N. QR Code
O. Skype
P. Spreadsheet
Q. Table
R. Take Photo
S. Zoom
Using this document you can learn more about how you can add a widget to your Outgrow content and how each of these widgets individually can offer real-time value to your content.
How to add a Widget to your Outgrow Content
To embed a widget in your Outgrow content, you can follow the below-mentioned steps:
1. Login to your Outgrow dashboard and open the respective content in Build mode.

2. In the Build tab, click on Add New button to add a new widget.

3. In the Widget tab, you can choose the respective widget that you would like to add in your Outgrow content

4. Once the widget is added, you can then go ahead and customize the widget as per your requirement. For each widget, you can customize the overall look and feel of the widget tab using the Design and Layouts tab. You can also configure User Redirect and add a Countdown Timer from the Advanced tab.

What value can each Widget add to your Content
A. Address Map Locator: This widget lets your users select their location using Google Maps. To add Google Maps to your content, you will have to add your Google Map API Key to your Outgrow content.
NOTE: To get your Google Maps API Key, go here and create one, then copy it back in the text box below. Open this link if you already have one.

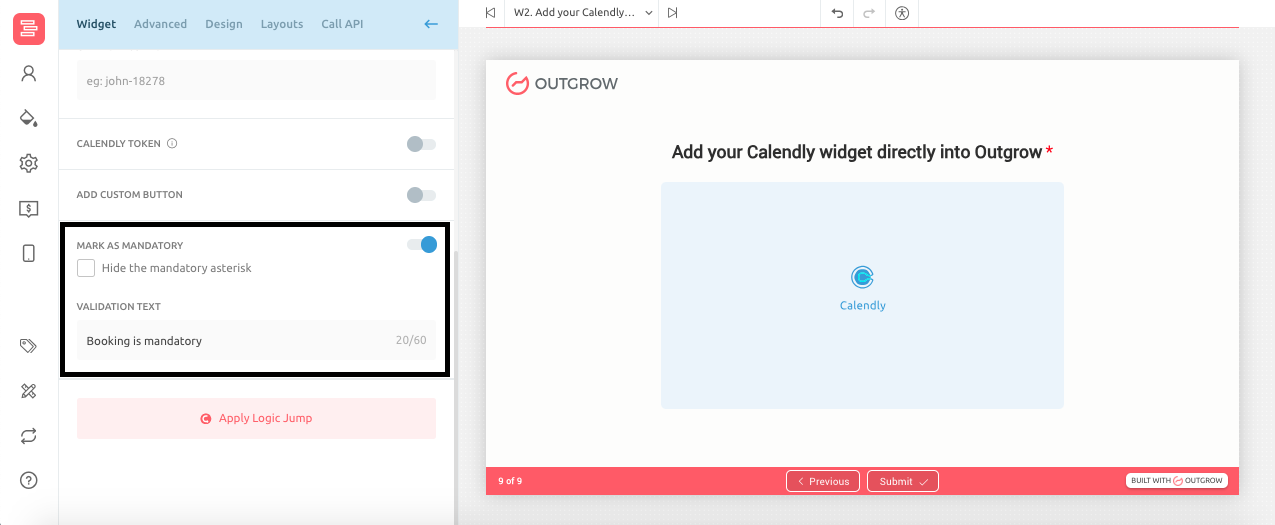
B. Calendly: You can let your users book a call with you or your team directly from your Outgrow content by embedding your Calendly widget. For this, you will have to add your Calendly User ID in your Outgrow builder for the respective content.

IMPORTANT NOTE
In case you have added a Calendly widget in your Outgrow content, to give an option to the users to schedule a meeting with you, you can now mark the call scheduling step as mandatory. By doing so, you can ensure that users are not able to move to the next step without scheduling a meeting with you.
C. Chart: You can embed a chart in your Outgrow content, using the Chart widget. Once the widget is embedded, you can click on the Edit icon (pencil icon) under Chart and update the values used in the chart. NOTE: You can import values to be used in the chart by either Importing an Excel file or by using JSON Feed URL to fetch the values.

You can choose from any of the below-mentioned options to display a chart in your content:
1. Column Chart
2. Bar Chart
3. Pie Chart
4. Line Chart
5. Scatter Chart
6. Dial Axis Chart

IMPORTANT NOTE
For the Charts widget, we support High Charts, Chart.js and Apex Charts as libraries.

D. ChiliPiper: You can now let users schedule an appointment with you directly from your Outgrow content by embedding the Chilipiper Appointment Scheduler widget in your content. For the widget to work, you must add your Chilipiper Scheduler URL in the respective content.

E. Country State & City List: With this widget, users can now easily select their Country, State, and City from a dynamic dropdown list. Here's how it works: When a user selects a Country from the dropdown menu, a State field will appear with a list of available State options based on the selected Country. Once a State is selected, a City field will appear with a dynamic set of values. This feature makes it quick and easy for users to select their location accurately and efficiently.

F. Custom HTML: Using the Custom HTML widget, you can display a customized information set in your content. This information could be text, video, etc, that can be helpful for you to communicate your message to the end user.

G. Dynamic Dropdown: Using this widget, you can display a subset of groups dynamically, depending on the values they select. Here are a few important things that you need to keep in mind:
A. Adding/removing the ( ) will create a nested option group.
B. You can nest lists as deeply as you want and use as many indentation spaces per line as you want.
C. The first level option group will have one ( ).
D. Increasing the number of ( ) will add the successive option as its child.
E. Decreasing the number of ( ) will put the option in its parent option group.
F. You can nest lists as deeply as you want and use as many ( * ) as you want, to project parent/child relations.

H. E-Signature: You can allow users to submit their eSignatures by embedding the eSignature widget in your Outgrow content. You can either opt to use a Custom eSignature type, or you can choose to integrate with DocuSign or Hellosign to collect eSignatures.

Here is how the integration with DocuSign or HelloSign will work:
1. Integrating with DocuSign: To use DocuSign to collect signatures, you must first authenticate DocuSign integration in your Outgrow content by adding your DocuSign Integration Key, Secret Key, and Redirect URL. You can then configure all fields for which the user will have to share his/her details for the form and can then set up how the document will be signed by the user.
NOTE: The Redirect URL is the URL to which DocuSign will redirect the browser after authentication when using the Authorization Code Grant authentication flow.

2. Integrating with HelloSign: To collect signatures using HelloSign, you must first authenticate the HelloSign integration in your Outgrow content by adding your HelloSign Client ID and API Key. Once authenticated, you can configure all fields for which the user will need to share their details in the form and set up how the user will sign the document.

I. Outreach: You can embed your Outreach appointment scheduling widget in your Outgrow content, to enable your users to schedule calls with you or your team on a real-time basis. You mus add your Outreach URL in your Outgrow content for the widget to work.

J. Payment Widget: If you want to collect payments using your Outgrow content, you can embed a Payment Widget in your content. You can integrate with either PayPal or PayU payment gateway to collect payments.
1. Integrating with PayU Payment Gateway: In order to integrate your PayU gateway, you need to add your Merchant POS ID, Secondary Key, oAuth Client ID, and oAuth Client Secret in the corresponding Outgrow content fields. Afterwards, you can specify the Currency and the Amount you wish to collect using your content. Please note that your Merchant account must support the currency you select.

2. Integrating with PayPal Payment Gateway: To set up your PayPal gateway, you must enter your Client ID and Secret Key in the corresponding Outgrow content. Then, specify the Currency and Amount to be collected through your content.

K. PDF Embedder: You can embed a PDF file in your Outgrow content on a Custom HTML page. Once the file is embedded in the content, users will be able to download as well as print the PDF file.

L. Phone Number Verification: If you are collecting phone numbers using your Outgrow content, you can opt to authenticate these numbers to ensure that your database stays healthy. You can authenticate and verify phone numbers by using:
1. Twilio With OTP.
2. Numverify Without OTP.
3. Numverify Without OTP (Via APILayer).

M. Products: If you want to let your users buy particular products through your Outgrow content, you can use the Product Widget. You can add the products manually, one by one. After that, you can integrate your content with Stripe Payment Gateway to collect the payment for the products.

N. QR Code: You can now utilize the QR Code Widget to embed a QR Code in your content. This allows users to scan the code and access any messages or information you have shared with them. It’s worth noting that this feature can be immensely helpful in scenarios where you want to promote app downloads, contact card sharing, and more.

O. Skype: You can allow users to reach out to you directly on Skype by embedding the Skype Widget in your Outgrow content. For the widget to work, you must specify your Skype Username in the Outgrow builder.

P. Spreadsheet: You can use the Spreadsheet widget to showcase a spreadsheet within your Outgrow content. You can customize the number of rows or columns to be displayed via the spreadsheet editor. Additionally, you can upload an Excel file to the spreadsheet and add information to it.

You can change the values displayed in the spreadsheet, and you can also update the look and feel of the spreadsheet using the spreadsheet editor.

Q. Table: It is possible to include a table on a Custom HTML page in your Outgrow content. You can use the Table widget to showcase relevant information in a tabular format. This can help your users make informed decisions or gain further insights about your offerings.

NOTE: You can update the rows and columns in the table by either uploading an Excel spreadsheet or by using a JSON URL.

R. Take Photo: By embedding the Take Photo Widget, You can allow users to take photos using your Outgrow content.

S. Zoom: You can allow users to schedule a meeting with you or your team by adding your Zoom Scheduler URL to the widget's content builder.

T. Review Before Submit: Users can now review their responses before submission using the provided widget.

If you still have any questions, feel free to contact us at [email protected] and our team can help you with a quick solution.
Updated about 2 years ago