Tracking Conversions through Outgrow Content using Facebook Pixel
This section outlines the steps you need to follow to start tracking events and the behavior of users on your Outgrow content using Facebook Pixel. Here are the prerequisites that you need to have in order to get started:
A. An active Facebook Ads Manager account.
B. A live Outgrow content piece.
How to Track Conversions with Facebook Pixel on Your Outgrow Content?
1. To start the setup process, log in to your Facebook Ads Manager. Go to the "Events Manager" section. Now select your Facebook Pixel and copy your Pixel ID.

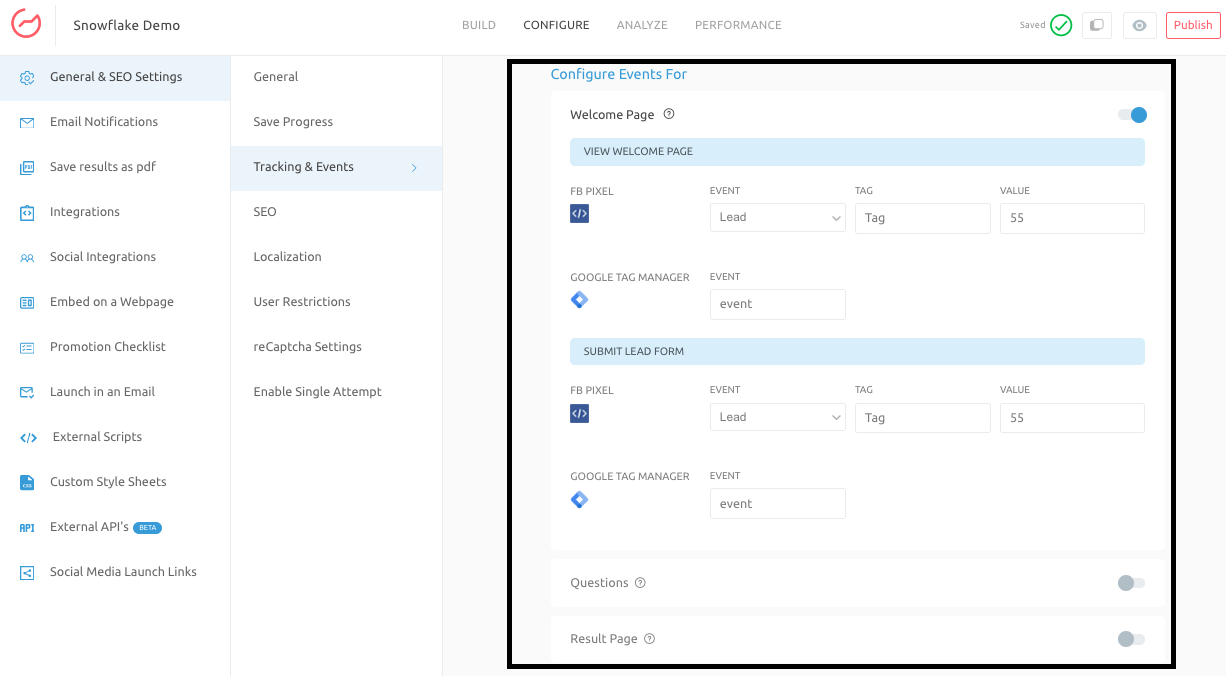
2. In your Outgrow content, navigate to Configure and then to General & SEO Settings. Paste your Pixel ID into the Facebook Pixel Tracking ID field.

3. To track custom events, you must ensure that Customize FB Pixel Events is toggled on.

4. Now you can configure tracking for desired events (e.g., Welcome Page, Questions, Results Page) and assign standard Facebook events (e.g., ViewContent, Lead). Use clear Tags and Values to categorize events for better organization and segmentation in Facebook Ads Manager reporting.
Important Note
A. Example: Viewing the results page triggers the ViewContent event. Submitting the lead form triggers the Lead event. You can choose any relevant Facebook event.
B. Use unique tags for events within each experience to differentiate them.
C. Assign distinct values to events within an experience for further segmentation.
5. Once your Outgrow content is live, you now need to go to Facebook Ads Manager, and create a campaign using your Outgrow content's URL. Customize columns to display relevant metrics (e.g., Leads, Content Views). NOTE: Columns can be customized in the Customize Columns sections under Ad Group.

6. Once the popup comes up, go to Conversions > Standard Events from the left panel and select the appropriate events as per the events configured in Outgrow. Click on Apply to save the changes.

7. Now, in the Ad Group section, you’ll be able to see the metrics for configured events. NOTE: For example, in the screenshot below you can see the columns for Leads and Content Views.

Important Note
A. For Facebook Pixel, Category and Action fields are required and label and Value fields are optional. Value takes whole numbers only and all other fields are text. One example Category: Guides; Action: Download-SEO, Event label: SEO Guide, Value: 15. Make sure to use consistent names for categories, actions, and labels.
B. For Facebook Pixel related Events Tracking to effectively work, you need to make sure that you use .US link and not .Co link. Facebook Pixel Tracking via Outgrow will not work on .Co links.
Create a custom conversion for your Outgrow content
Custom conversions enable filtering events using parameter or URL rules for more detailed insights into visitor actions.

To use Custom Conversions to filter events, here are the steps you can follow:
- Go to Meta Events Manager > Custom conversions.
- Click Create Custom Conversion.
- Enter a name and optional description.
- Select your data source and conversion event. If applicable, choose a standard event category for optimization.
- Set up rules using URL or event parameters. Add more rules if needed.
- Enter a conversion value if events lack one. Use whole numbers only. Click Create to save the custom conversion.
IMPORTANT NOTE
A. The maximum number of custom conversions per ad account or business portfolio is 100. You can delete existing ones to create new ones.
B. Parameters use the 'OR' condition.
C. Rules use the 'AND' condition.
Checking if Pixels are firing or not
Go to Events Manager in your Facebook Ad Account and click the Overview tab for details about configured Pixels. Use the Diagnostics or Troubleshooting tools in Events Manager to identify and resolve Pixel issues.

IMPORTANT NOTE
Use the "Diagnostics" or "Troubleshooting" tools in the Events Manager to identify and resolve any Pixel issues.
Segmenting the audience by using a custom Facebook Pixel based on the option selected in a question.
To create an audience based on answers to a specific question:
A. Set the event type to Track Custom.
B. In the Tag field, add the variable {QX}, where X is the question number.
C. Custom events will fire automatically when users select an answer.
Firing a custom event based on an outcome
To fire a custom pixel based on an outcome:
A. Choose Result Page View or CTA as the Event Type
B. In the Event Value field, specify {OutcomeX}, where X is the outcome number
C. Segment the pixel further in Facebook Ads Manager
IMPORTANT NOTE
{R1} works in the VALUE field for numerical representation. To display text, use it in the TAG Value field, not the VALUE field.
Troubleshooting Event Appearance
If events don't appear in the Test events tab within one minute, you can go through the following troubleshooting steps:
A. Try Pixel troubleshooting
B. Disable ad blockers
C. Refresh the website and interact again
D. Try app troubleshooting (if applicable)
E. Force quit and restart the app
F. Ensure you're logged in to the Facebook app
Configuring Meta Conversions API to be used in Outgrow
The Conversions API connects your marketing data (website/app events, offline conversions) from your server, platform, or CRM to Meta for ad optimization and measurement.
Prerequisites:
A. Facebook Pixel ID
B. Business Manager account
C. Access Token (obtain from Events Manager or Business Manager)
Steps to Send Events:
1. Generate Access Token:
A. In Events Manager, select your Pixel and go to the Settings tab
B. In the Conversions API section, click Generate access token under Set up manually and follow the instructions.
2. Make a POST Request:
A. Send events using a POST request to the API endpoint: graph.facebook.com/{API_VERSION}/{PIXEL_ID}/events?access_token={TOKEN}.
B. Replace placeholders with your actual values.
C. The payload structure will depend on the specific event you're tracking. For detailed payload examples, refer to Facebook's Conversions API documentation .
3. Confirm Event Receipt:
A. In Events Manager, go to Data Sources and click the relevant Pixel
B. In Events Manager > Overview, see raw, matched, and attributed events
C. Check Connection Method to see how events were sent
D. Click on individual events for more details
E. Verification should take up to 20 minutes
F. Use the Test Events feature in Events Manager to verify server events
Payload System
After generating the access token, you'll need to construct payloads containing event data to send to the Conversions API endpoint.
Creating Payloads
Payloads are JSON objects that encapsulate information about the events you want to track. The structure of the payload will vary depending on the specific event type you're sending. Refer to Facebook's Conversions API Payload Helper documentation to learn more about creating Payload for your content for different event types.
Key components of a payload typically include:
event_name: The name of the standard or custom event you are tracking (e.g., 'Purchase', 'Lead', 'ViewContent').
event_time: The timestamp (in Unix time format) when the event occurred.
event_source_url: The URL of the page where the event happened.
user_data: Information about the user who triggered the event. This can include hashed identifiers like email, phone number, or client IP address, along with other optional data like city, state, country, etc.
custom_data: Additional event-specific parameters you want to track (e.g., product IDs, quantities, values).
action_source: Indicates where the event originated (e.g., 'website', 'app').
Here are a few example payloads for different Outgrow events:
A. Lead Capture Event Payload:
{
  "data": [
    {
      "event_name": "Lead",
      "event_time": 1234567890,
      "event_source_url": "https://www.example.com/outgrow-content",
      "user_data": {
        "em": "[email protected]",
        "ph": "hashed_phone_number",
        "client_ip_address": "123.45.67.89",
        "client_user_agent": "Mozilla/5.0..."
      },
      "custom_data": {
        "lead_type": "Contact Form Submission",
        "content_name": "Outgrow Quiz"
      },
      "action_source": "website"
    }
  ]
}
B. Page View Event Payload:
{
  "data": [
    {
      "event_name": "PageView",
      "event_time": 1234567890,
      "event_source_url": "https://www.example.com/outgrow-content",
      "user_data": {
        "client_ip_address": "123.45.67.89",
        "client_user_agent": "Mozilla/5.0..."
      },
      "action_source": "website"
    }
  ]
}
C. Question Answered Event Payload: In this JSON, you will notice that there is an attribute for custom_data as well. This attribute captures the question_id and the answer_selected. You can use additional custom data parameters here to track other details about the question or the user's interaction, such as the question text, the type of question, or any other relevant custom information parameters.
{
  "data": [
    {
      "event_name": "CustomEvent", // Or a more specific standard event if suitable
      "event_time": 1234567890,
      "event_source_url": "https://www.example.com/outgrow-content",
      "user_data": {
        "client_ip_address": "123.45.67.89",
        "client_user_agent": "Mozilla/5.0..."
      },
      "custom_data": {
        "question_id": "Q3",
        "answer_selected": "Option B"
      },
      "action_source": "website"
    }
  ]
}
IMPORTANT CONSIDERATIONS
A. About action_source Attribute: The action_source attribute indicates the origin of the event. In the context of Outgrow, it's typically set to website since the events are happening on your website where the Outgrow content is embedded
B. Hashing User Data: It's crucial to hash sensitive user data like email addresses and phone numbers before including them in the payload to comply with privacy regulations. Facebook provides hashing functions for this purpose.
C. Data Validation: Ensure your payload adheres to Facebook's event specifications to avoid errors and ensure accurate tracking.
D. Custom Events & Parameters: For custom events or additional parameters, ensure they are defined and set up correctly in your Facebook Events Manager.
E. Custom Data and Custom Information Parameters:
E.1. Custom Data Parameters: These are additional parameters you can include within the custom_data object to capture specific details about the event that are not covered by standard event parameters. For example, in the "Lead Capturing" example, you might include parameters like "lead_source" or "form_id."
E.2. Custom Information Parameters: These are parameters related to the user or their context that you might want to track alongside the event. Examples include user demographics, preferences, or any other relevant information you collect.
Sending Payloads
A. Use tools like Postman or cURL to make POST requests to the API endpoint with your payload data.
B. Set the Content-Type header to application/json.
NOTE
The actual payload structure might need adjustments based on your specific Outgrow setup and the data you want to capture. Always refer to Facebook's official Conversions API documentation for the most accurate and up-to-date information.
Feel free to reach out to us at [email protected] if you have any questions or concerns. We will be happy to assist you further.
Updated almost 2 years ago