Introduction to The Outgrow Builder
The Outgrow Builder is a powerful and user-friendly platform that lets you create interactive experiences in just a few minutes. It's divided into three parts: designing the welcome screen, setting up questions, and configuring the result pages. In this document, we'll take a closer look at each of these parts to help you get the most out of your experience.
Designing the Welcome Screen & setting up the Content Title
Before you start creating your interactive content, you need to design the welcome screen and set up the content title. The welcome screen is the first thing your users will see, so you want it to be engaging and informative.

You can configure the font type, font size, and text alignment for the welcome page text under the Design tab. You can also upload a background image and set the tint in this section. Keep in mind that the recommended minimum image size for the background image is 1250 pixels * 800 pixels, and the maximum supported file size is 1 MB.
You can also choose the layout that you want to use to display the information and media on the welcome screen of your Outgrow content under the Layouts sub-tab. The title of your content is equally important as it's the first thing that catches the user's attention. Make sure it's catchy, short, and focused on the benefit someone will get from your content. You can also use phrases like "the hardest quiz" or "the most challenging test" to grab their attention.

Setting up Questions in Outgrow
Once you've designed the welcome screen and set up the content title, it's time to set up questions. This is the most important part of your interactive content as it helps you collect data from your users. Depending on the content type you choose to create, Outgrow provides multiple question types such as Multi-Select, Single-Select, Drop-Down, Text Input, Text Area, Numeric Slider, Numeric Range Slider, Opinion Scale, Rating, Ranking Grid, Date/Time Picker, and File Upload, that you can choose from. You can configure the question text, help text, and options available for selection. You can also mark a question as mandatory or non-mandatory.

In the Advanced Tab, you can enable the settings for allowing users to be redirected to a different page when they click on submit, setting up a fallback value that will be used in result calculation or sent to the CRM, displaying feedback to a user when a response is submitted, and adding a countdown timer within which the user needs to submit a response.

From the design tab, you can configure the font settings that you would like to use for displaying the question and response text. You can also upload the background image that you would like to show on the questions page.
Lastly, from the Layouts tab, you can choose the design layout that you would like to use to display questions and responses.

Pro Tip
Questions play an important role in the customer funnel; here are some of the best practices that can be used in your content pieces:
A. Five to Ten Questions: You want to have enough questions that the users trust your content but not so many that they bounce off. There is a fine line and delicate balance between this and if you are building a B2C calculator, you want to make sure it's short and fun. B2B calculators can be a little longer but they still have to be engaging, especially if you are targeting people at the top of the funnel.
For longer content pieces, over 8-10 questions, have them divided into sections so you don’t scare away users with a long list of questions on one page.
B. Use Checkboxes and Sliders: Avoid asking for text inputs because they are ambiguous and require too much thinking and time from users. Say you’re asking someone their height, provide a slider with pre-standardized units instead of letting the user imagine which units she should use. Some of the Outgrow templates come with in-built slider question types. You'll learn more about them in the K Create a Calculator ] section.
C. Display 1-2 Questions at a Time: To avoid confusing the user, stick to one or two questions at a time unless the calculator requires real-time variable adjustment and calculations.
Setting up Results in Outgrow
This is where it all comes home. The user filled out your questionnaire in anticipation of a result that adds value and/or is interesting. So your results need to be such that they do not disappoint the customers. Using Outgrow's intuitive content builder, you can design the results page of your content to ensure that you display important information along with rich media for the users.
Here are the key things that you can customize on the Results page:
- Add or customize results/outcomes.
- Add media (specific to each result/outcome).
- Add primary and secondary buttons for download or redirection.
- Customize the overall heading and subheading.
- Add common media for all results/outcomes.
- Customize the footer section with share, subscribe, disclaimer, and retake options.
- Upload background image and configure font settings.
- Choose the layout for displaying information, including Results Text and Media.

Pro Tip
Here are some of the best practices that can be used while designing the results page in your content pieces:
1. Show Rich Results: To make the results richer, you can show multiple results instead of just a single number. For example, showing app development cost estimates by region adds to the analysis. Or, while showing ROI, you can show ROI over six months, one year, and two years.
2. Use Images & Charts: Use graphics to make the user experience more appealing.
3. Show Comparisons: You can even show comparisons. For example, show a comparison between “how much would you save by using [company’s] products” and also provide a way to save the results if you feel this can be useful to the customer in future
4. Show Breakdown: Instead of simply giving a number, as a result, you can even try to showcase the cost breakdown of each of the line items in a quoting calculator for example. This can allow the user to see how each component impacts the price.
5. Have a clear call to action: Now that you have added value to the user, think about the right next step for a user at that point and have a clear call to action on that page.
6. Provide Ranges: Services businesses like legal and software design will usually provide a range: cost is between $8K to $12K, instead of paying $10K. This reduces the risk of committing a specific price point to a user.
7. Have a Disclaimer: It’s good to have a short disclaimer saying that all results are not binding in any way and are simply estimates to be used for educational purposes. This way, you are not guaranteeing anything in your content, and you are not in question as there are different types of users and not all results can match their needs or expectations.
Best Practices to follow while creating an Interactive Content
Here are some best practices to follow when creating interactive content:
-
Keep the number of questions between five to ten. You want to have enough questions that the users trust your content but not so many that they bounce off. Strike a balance between these two.
-
Use checkboxes and sliders instead of text inputs because they are ambiguous and require too much thinking and time from users.
In conclusion, Outgrow Builder is an intuitive and flexible platform that makes it easy to create highly optimized interactive experiences in minutes. With the right design, questions, and best practices, you can create engaging and informative content that helps you collect data and drive conversions.
IMPORTANT NOTE
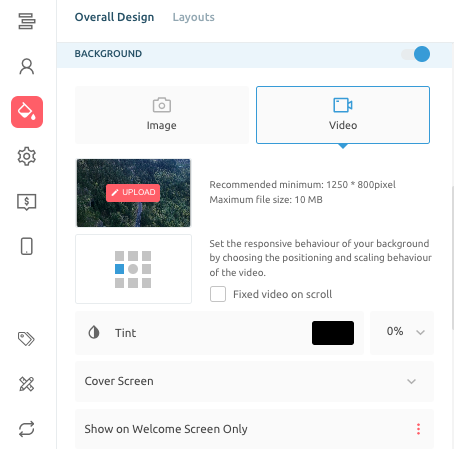
Using the Overall Design tab, or from the Design tab present under Welcome Page, Question Page or Result Page, you can now set a video as a background in your Outgrow content. You can upload a MP4 video either from your computer, or can add a URL for the video. The dimensions of the video needs to be atleast 1250 X 850 Pixel, and the maximum video size could be of 10 MB only.
In case of doubt or discussion, you can also reach out to us at [email protected], and we will gladly assist you further.
Updated about 2 years ago