Quick Launch Guide: Build and Launch Your First AI Agent In Minutes
This article provides the shortest practical path to creating and publishing an AI Agent in Outgrow. It is intended for teams that want to launch efficiently while still following the essential setup steps that affect quality, accuracy, and user experience.
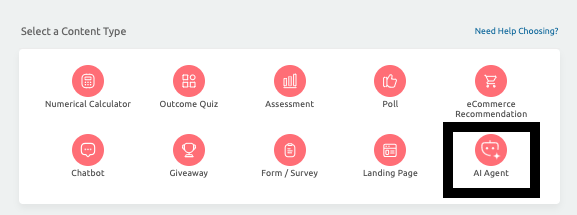
A. Step 1: Create the AI Agent: Begin by creating a new AI Agent in Outgrow. At the beginning of the setup process, you will see a field labeled Website URL. Here, you can enter your website link or a sitemap URL. You can choose whether you want to use this link as a training source for the agent.
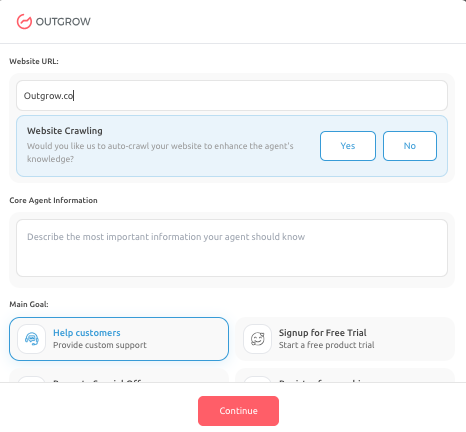
B. Step 2: Provide Core Agent Information: In the Core Agent Information field, you should describe the most important information your AI Agent needs to know about your business. This may include:
- What your business does
- Your key offerings
- Your target audience
- The type of questions users may ask
A clear and structured description ensures that the AI Agent behaves consistently and provides relevant responses during conversations.
C. Step 3: Select the Main Goal: Under the Main Goal section, you will select the primary objective of your AI Agent. The available options include:
- Help Customers: Provide customer support and answer queries
- Signup for Free Trial: Guide users toward starting a free trial
- Promote Special Offer: Highlight discounts or campaigns
- Register for a Webinar: Capture registrations for events
- Other: Define a custom goal based on your specific use case
Selecting the correct goal is important because it directly influences how the AI Agent interacts with users and what actions it prioritizes. Click on Continue to move to the Bot Configuration section.
D. Step 4: Configure Data Sources for Your AI Agent: After defining your AI Agent’s goal, the next important step is to provide it with relevant knowledge sources. You can do this through the Data Source section, which allows you to train your AI Agent using:
- Using Source Link: In the Source Link tab, add your links, fetch pages, select relevant ones, and start training while tracking their status.
- Upload Source: Upload documents such as PDFs, DOCX, or CSV files
- Text Area: Add short content directly for quick updates or announcements

All Trained Files allows you to manage and review all trained content. It is recommended to train only on relevant, high-quality sources, avoid unnecessary pages, and regularly review and update your data.
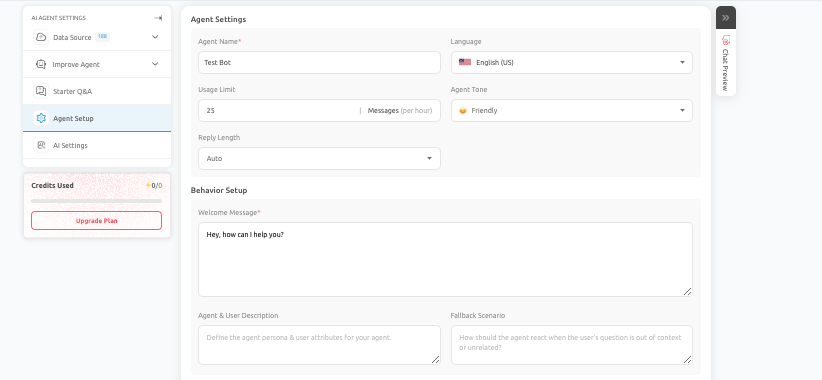
E. Step 5: Configure AI Agent Settings: In the Agent Setup section, you define how your AI Agent behaves and communicates. You can configure:
- Agent Name: Internal name for identification.
- Language: Primary language used in conversations.
- Usage Limit: Number of messages per hour.
- Agent Tone: Communication style, such as friendly or professional.
- Reply Length: Determines how detailed responses should be.
- Welcome Message: This is the first message users will see when they open the AI Agent. It should clearly communicate how the AI Agent can assist them.
- Agent & User Description: This defines the AI Agent's role and the type of user it interacts with. Providing a clear description improves response accuracy and consistency.
- Fallback Scenario: This determines how the AI Agent should respond to unclear, unrelated, or unsupported queries.
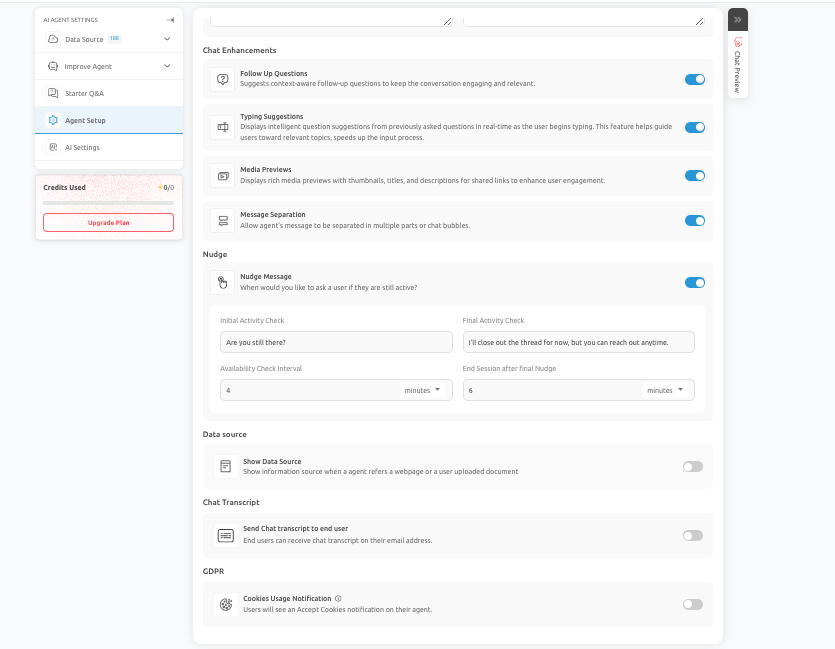
- Chat Enhancements: You can enable the following features:
- Follow-Up Questions: Helps continue the conversation naturally.
- Typing Suggestions: Assists users while typing queries.
- Media Previews: Displays link previews for better engagement.
- Message Separation: Improves readability by breaking responses into smaller messages.
- Nudge Settings: Re-engage inactive users.
- Show Data Source: Display where answers are derived from.
- Chat Transcript: Send conversation transcripts to users.
- GDPR Settings: Enable cookie and privacy notifications.
Ensure that the welcome message is clear and helpful, define a strong agent description to guide behavior, and provide fallback responses that offer a meaningful next step.
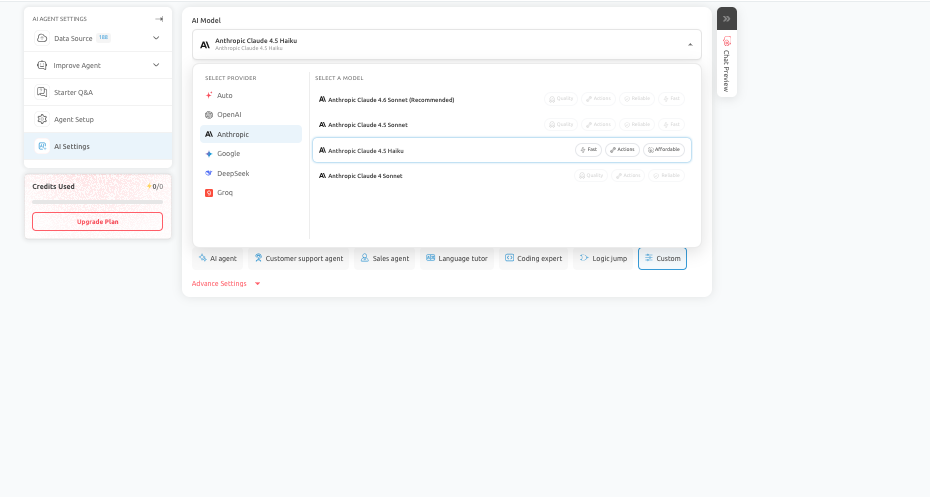
F. Step 6: Select AI Model and Configure Prompt: In this section, you configure the intelligence and behavior of your AI Agent. You can choose from multiple AI providers and models based on your needs. Different models offer varying levels of:
- Response quality
- Speed
- Cost efficiency
Select a model that aligns with your use case. For example, high-quality models are better suited to sales or support conversations, while lighter models are better suited to FAQs.
You can also configure the AI prompt to guide how your AI Agent behaves. You can:
- Edit the prompt manually
- Enhance it using the Enhance Prompt feature
- Customize behavior based on your business needs
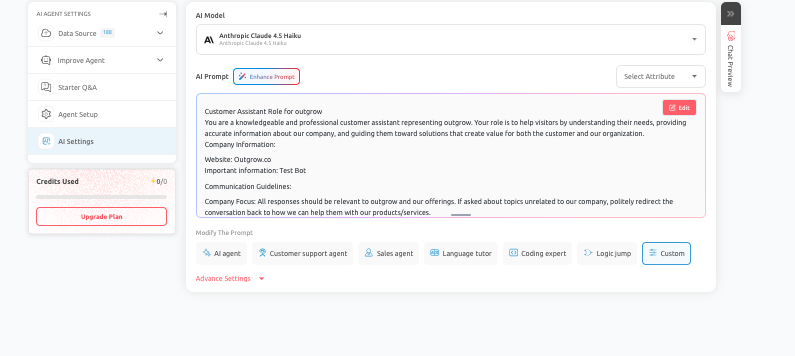
Your AI Prompt should include Role Definition, Company Context, Communication Guidelines, and Response Boundaries. You can also use the Enhance Prompt option to improve the structure, clarity, and effectiveness of your existing prompt. It is useful when:
- Responses feel too generic
- The AI Agent is not aligned with the goal
- Conversation flow needs improvement
IMPORTANT NOTE
Always review the prompt before proceeding, ensure it clearly reflects your business objective, and test how the AI Agent responds after making any changes.
G. Step 7: Test Your AI Agent Using Chat Preview: Before publishing, you should test your AI Agent using the Chat Preview feature. This allows you to simulate real user interactions and verify response accuracy, conversation flow, data collection, and goal completion. What to test here is:
- Common user questions
- Incomplete inputs
- Edge cases
- Goal-driven flows
You should use real-world queries instead of ideal examples to test multiple scenarios and should refine prompt or settings if needed.
H. Step 8: Test before you publish: Use Chat Preview to test typical user questions, incomplete answers, objections, and happy-path scenarios. Confirm that the AI Agent asks the right follow-up questions, collects the correct information, and moves users toward the intended next step.
I. Step 9: Publish and monitor: When testing is complete, publish the AI Agent to the appropriate channel. After launch, review conversations, leads, and visitor behavior to improve the setup based on actual user interactions rather than assumptions.
Conclusion
By completing these steps, you will have successfully created and launched a fully functional AI Agent within Outgrow. Each step in this process contributes to the overall performance and effectiveness of your AI Agent, so it is important to configure and test carefully before publishing. Feel free to use our chat tool on the bottom right or reach out to us at [email protected] if you have any questions, and our team can help you with a quick solution.
Updated 3 months ago